REST API
ES 는 http 프로토콜로 접근이 가능(RESTFul 한 시스템의 특징)한 REST API를 지원한다.
| http 메서드 종류 | 예시 | RESTFul 하지 않은 경우 예시 |
| PUT | PUT http://user.com/kim -d {"name":"kim", "age":38, "gender":"m"} | http://user.com/input.jsp?name=kim&age=38&gender=m |
| POST | ||
| GET | GET http://user.com/kim | http://user.com/get.jsp?name=kim |
| DELETE | DELETE http://user.com/kim | http://user.com/delete.jsp?name=kim |
REST API 를 지원하는 시스템은 데이터에 대해 항상 단일 URL로 접근하고, http 메서드로 데이터를 처리할 수 있다.
그래서 간편하게 curl 을 이용하여 REST API 사용이 가능하다.
접근
ES에서는 단일 document 별로 접근이 가능하다.
6.X 버전까지
http://<호스트>:<포트>/<인덱스>/<도큐먼트 타입>/<도큐먼트 id>

7.X 버전부터
http://<호스트>:<포트>/<인덱스>/_doc/<도큐먼트 id>
ES 7.0 버전 부터는 document type 개념이 사라지고 대신 고정자 _doc 으로 접근해야 한다.
다음 예시는 my_index 인덱스에 document id 가 1인 데이터를 입력하는 예제다.
$ curl -XPUT "http://localhost:9200/my_index/_doc/1?pretty" -H 'Content-Type: application/json' -d'
{
  "name": "Jongmin Kim",
  "message": "안녕하세요 Elasticsearch"
}'

		RESPONSE
{
  "_index" : "my_index",
  "_type" : "_doc",
  "_id" : "1",
  "_version" : 2,
  "result" : "updated",
  "_shards" : {
    "total" : 2,
    "successful" : 1,
    "failed" : 0
  },
  "_seq_no" : 1,
  "_primary_term" : 1
}
입력 & 수정 ( PUT & POST )
데이터 입력시엔 PUT 과 POST메서드를 사용한다.
다음은 Kibana Dev tool 에서 PUT 명령어를 사용하는 예시다.
| request | response |
| PUT my_index/_doc/1 { "name":"Jongmin Kim", "message":"안녕하세요 Elasticsearch" } |
{ "_index" : "my_index", "_type" : "_doc", "_id" : "1", "_version" : 1, "result" : "created", "_shards" : { "total" : 2, "successful" : 1, "failed" : 0 }, "_seq_no" : 0, "_primary_term" : 1 } |
최초 입력시 결과에는
"result" : "created" 로 표시된다. 동일한 URL로 다른 내용의 document를 입력하게 되면
기존 document 는 삭제되고 새로운 document로 덮어씌워진다.
이 때 "result" : "updated" 라고 표시된다.
실수로 덮어씌워지는 것을 방지하기 위해서 _doc 대신 _create 를 사용하여 제한할 수 있다.
이 경우 기존에 데이터가 존재하면 error가 발생한다.
| request | response |
| 7.X 버전 PUT my_index/_create/1 { "name":"Jongmin Kim", "message":"안녕하세요 Elasticsearch" } 6.X 버전 PUT <인덱스>/<도큐먼트 타입>/<도큐먼트 id>/_create |
{ "error": { "root_cause": [ { "type": "version_conflict_engine_exception", "reason": "[1]: version conflict, document already exists (current version [2])", "index_uuid": "qYOJI9ELR2-HqVtgTeI9jw", "shard": "0", "index": "my_index" } ], "type": "version_conflict_engine_exception", "reason": "[1]: version conflict, document already exists (current version [2])", "index_uuid": "qYOJI9ELR2-HqVtgTeI9jw", "shard": "0", "index": "my_index" }, "status": 409 } |
POST
POST 메서드는 PUT과 유사하지만
document ID를 임의로 생성해준다는 차이점이 있다.
| request | response |
| POST my_index/_doc { "name":"Jongmin Kim", "message":"안녕하세요 Elasticsearch" } |
{ "_index" : "my_index", "_type" : "_doc", "_id" : "ZuFv12wBspWtEG13dOut", "_version" : 1, "result" : "created", "_shards" : { "total" : 2, "successful" : 1, "failed" : 0 }, "_seq_no" : 0, "_primary_term" : 1 } |
또한,
POST 를 사용해서 더 쉽게 수정을 할 수 있다.
필드가 많은 데이터의 경우 수정이 필요할 때 필드값 하나를 바꾸기 위해서 모든 필드값을 작성해야 하는 경우 사용한다. 업데이트 할 내용에 "doc" 라는 지정자를 사용한다.
| request | response |
| 7.X 버전 POST <인덱스>/_update/<도큐먼트 id> 6.X 버전 POST <인덱스>/<도큐먼트 타입>/<도큐먼트 id>/_update POST my_index/_update/1 { "doc": { "message":"안녕하세요 Kibana" } } |
{ "_index" : "my_index", "_type" : "_doc", "_id" : "1", "_version" : 2, "result" : "updated", "_shards" : { "total" : 2, "successful" : 2, "failed" : 0 }, "_seq_no" : 1, "_primary_term" : 1 } |
업데이트는 POST 를 하더라도 전체 데이터를 불러와서 수정하고 PUT으로 입력되기 때문에 _version이 1씩 증가한다.
조회 ( GET )
document의 내용과 다양한 정보를 가져오며, 내용은 _source 항목에 표시된다.
| request | response |
| GET my_index/_doc/1 |
{ "_index" : "my_index", "_type" : "_doc", "_id" : "1", "_version" : 2, "_seq_no" : 1, "_primary_term" : 1, "found" : true, "_source" : { "name" : "Jongmin Kim", "message" : "안녕하세요 Elasticsearch" } } |
삭제 ( DELETE )
Delete 메서드를 사용하면 document 또는 index 단위로 삭제가 가능하다.
| request | response |
| DOCUMENT 삭제 DELETE my_index/_doc/1 |
{ "_index" : "my_index", "_type" : "_doc", "_id" : "1", "_version" : 3, "result" : "deleted", "_shards" : { "total" : 2, "successful" : 2, "failed" : 0 }, "_seq_no" : 2, "_primary_term" : 1 } |
| 삭제된 데이터에 대해 GET 을 요청하면 "found" : false 결과를 반환한다. GET my_index/_doc/1 |
{ "_index" : "my_index", "_type" : "_doc", "_id" : "1", "found" : false } |
| 인덱스 삭제 DELETE my_index |
{ "acknowledged" : true } |
| 삭제된 인덱스에 대해 GET을 요청하면 404 오류가 반환된다. GET my_index/_doc/1 |
{ "error" : { "root_cause" : [ { "type" : "index_not_found_exception", "reason" : "no such index [my_index]", "resource.type" : "index_expression", "resource.id" : "my_index", "index_uuid" : "_na_", "index" : "my_index" } ], "type" : "index_not_found_exception", "reason" : "no such index [my_index]", "resource.type" : "index_expression", "resource.id" : "my_index", "index_uuid" : "_na_", "index" : "my_index" }, "status" : 404 } |
Bulk API
bulk api는 여러 명령을 배치로 수행하기 위해서 사용한다.
index, create, update, delete의 동작이 가능하며 delete를 제외한 명령은
한 줄씩 순서대로 입력해야 한다. 명령문과 데이터문은 반드시 한 줄 안에 입력되어야 하며, 줄바꿈은 안된다.
| request | response |
| 각 명령어의 결과가 items에 배열로 리턴된다. POST _bulk {"index":{"_index":"test", "_id":"1"}} {"field":"value one"} {"index":{"_index":"test", "_id":"2"}} {"field":"value two"} {"delete":{"_index":"test", "_id":"2"}} {"create":{"_index":"test", "_id":"3"}} {"field":"value three"} {"update":{"_index":"test", "_id":"1"}} {"doc":{"field":"value two"}} |
{ "took" : 440, "errors" : false, "items" : [ { "index" : { "_index" : "test", "_type" : "_doc", "_id" : "1", "_version" : 1, "result" : "created", "_shards" : { "total" : 2, "successful" : 1, "failed" : 0 }, "_seq_no" : 0, "_primary_term" : 1, "status" : 201 } }, { "index" : { "_index" : "test", "_type" : "_doc", "_id" : "2", "_version" : 1, "result" : "created", "_shards" : { "total" : 2, "successful" : 1, "failed" : 0 }, "_seq_no" : 1, "_primary_term" : 1, "status" : 201 } }, ... |
| 모든 명령이 하나의 인덱스에서 실행되는 경우 <인덱스명>/_bulk 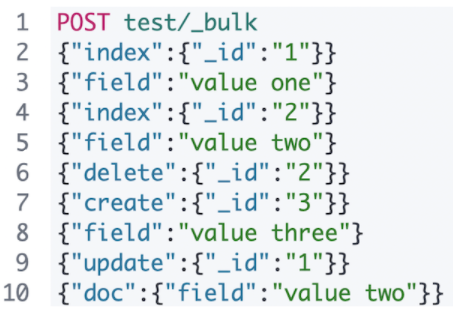 |
_bulk 동작은 따로 수행하는 것보다 속도가 훨씬 빠르다. 그래서 대량의 데이터를 입력할 때 사용하며
Logstash 와 Beats 등 ES에서 제공하는 client는 대부분 bulk를 사용한다.
ES 에는 commit 이나 rollback 등의 트랜잭션 개념이 없어서, _bulk 작업 중 연결이 끊어지거나 시스템이 다운되면 어느 명령어까지 수행했는지 확인이 불가능하다. 그래서 보통 이런경우에는 전체 인덱스를 삭제하고 처음부터 다시하는게 안전하다.
파일에 저장 내용 실행
벌크 명령을 파일로 저장하고 curl 명령으로 실행시킬 수 있다.
저장한 명령 파일을 --data-binary 로 지정하면 저장된 파일로 부터 입력할 명령과 데이터를 읽어올 수 있다.
| 파일 내용 ( bulk.json ) | 벌크 입력 |
| {"index":{"_index":"test","_id":"1"}} {"field":"value one"} {"index":{"_index":"test","_id":"2"}} {"field":"value two"} {"delete":{"_index":"test","_id":"2"}} {"create":{"_index":"test","_id":"3"}} {"field":"value three"} {"update":{"_index":"test","_id":"1"}} {"doc":{"field":"value two"}} |
$ curl -XPOST "http://localhost:9200/_bulk" -H 'Content-Type: application/json' --data-binary @bulk.json |
참고
링크1
'Elasticsearch > 이론' 카테고리의 다른 글
| [ElasticSearch_이론] 검색기능 (0) | 2022.03.06 |
|---|---|
| [ElasticSearch_이론] 순서 (0) | 2022.03.02 |

